| At line 12 changed 2 lines |
| | blender |
| | nns plugins |
| | Blender |
| | NNS plugins |
| | melonds |
|
|
| __Note: I will not be teaching you how to acquire or teach you the basics of using your Linux distribution, that is up to the user to figure out to use it or how to install blender, wine, Melonds or steam as the installation can completely vary from the distribution you are using, i simply will be teaching you how to generally use these programs within the environment. I will also not provide on how to acquire a MKDS rom, it is up to you to dump the game or find it. I will also assume you already have the NNS plugins installed on blender and have some starting experience with it.__ |
|
| !!!Getting started: |
|
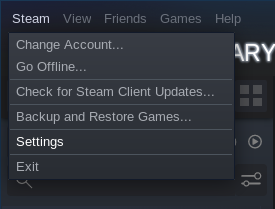
| With all tools installed, what first you will want to do is launch steam and enter in your steam account, if you don't then create your steam account. After that is done you will be greeted to the main screen. What you will want to do is go to the settings located here: |
|
| [{Image src='https://cdn.discordapp.com/attachments/910541946014011462/970379717888852008/Screenshot_from_2022-05-01_13-37-27.png' width='..' height='..' align='left|center|right' style='..' class='..' }] |
|
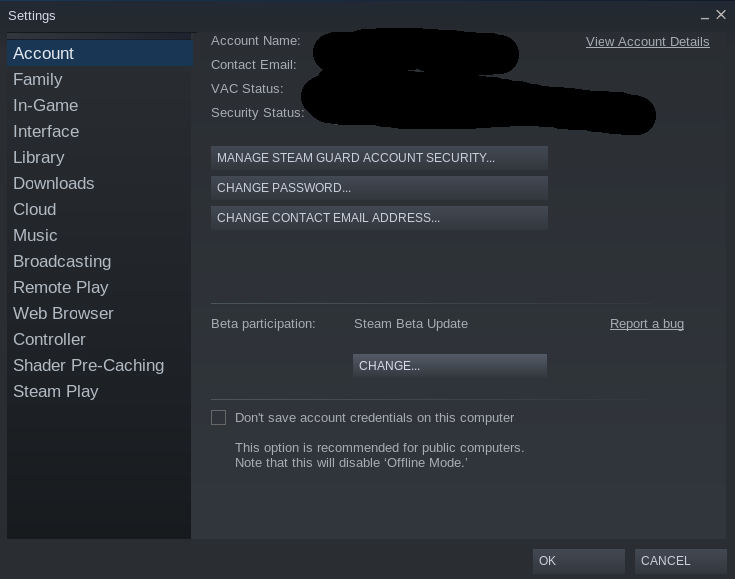
| You the will be greeted with this window, go to beta participation, for you it would be set to none, change it to __Steam beta update__: |
|
| [{Image src='https://cdn.discordapp.com/attachments/910541946014011462/970380516790526054/Screenshot_from_2022-05-01_13-37-35.png' width='..' height='..' align='left|center|right' style='..' class='..' }] |
|
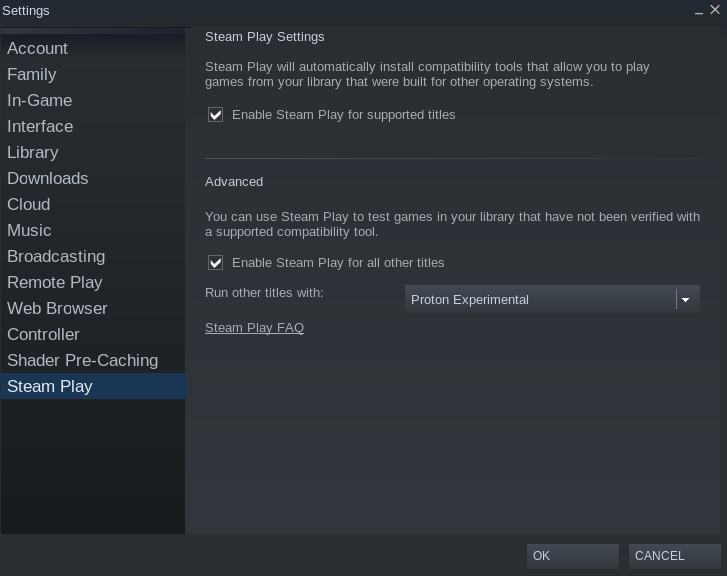
| Afterwards just let steam restart and let it update to steam beta. Once you are back to the main screen again go to settings again and click on steam play: |
|
| [{Image src='https://cdn.discordapp.com/attachments/910541946014011462/970381740562591814/Screenshot_from_2022-05-01_13-38-15.png' width='..' height='..' align='left|center|right' style='..' class='..' }] |
|
| After you are there, Enable steam play for all other titles and set it to proton experimental. |
|
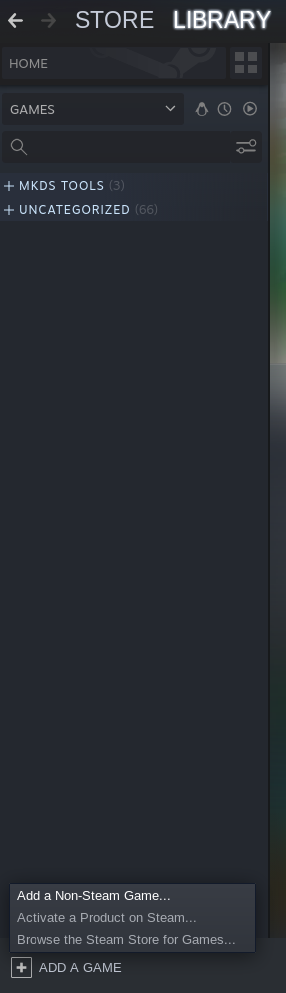
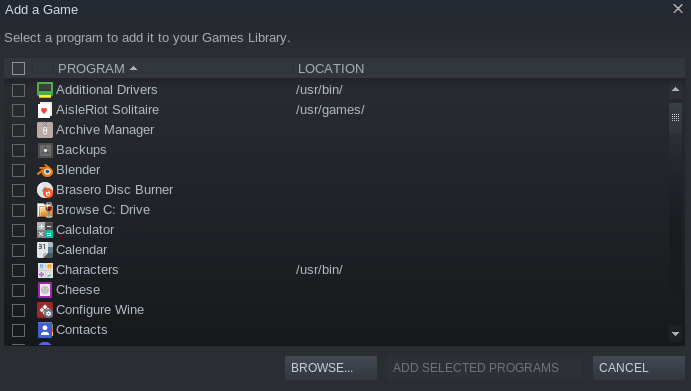
| Now that you have access to steam proton and will be able to run Mktoolbox and Nitropaint. But first we will need to add Mktoolbox and Nitropaint as non-steam games in our library. So go to the library tab in steam and click on __Add A Game__, then select __Add a non-steam game__: |
|
| [{Image src='https://cdn.discordapp.com/attachments/910541946014011462/970383766566608956/Screenshot_from_2022-05-01_13-58-03.png' width='..' height='..' align='left|center|right' style='..' class='..' }] |
|
| you will be greeted with a window to select any non steam game you have available, click on browse: |
|
| [{Image src='https://cdn.discordapp.com/attachments/910541946014011462/970384088303300648/Screenshot_from_2022-05-01_13-59-27.png' width='..' height='..' align='left|center|right' style='..' class='..' }] |
|
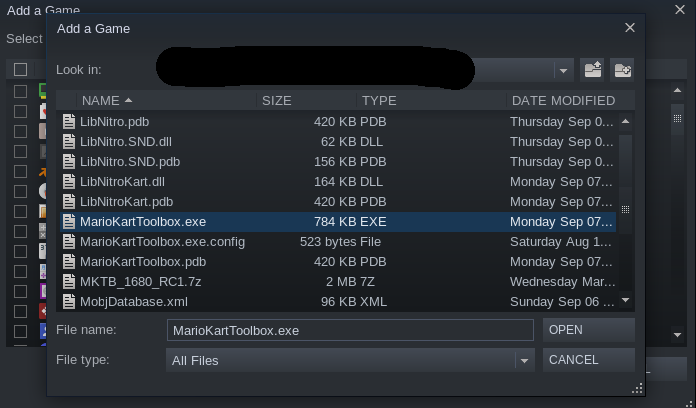
| __Note: Remember to have Mktoolbox and Nitropaint downloaded and extracted.__ |
|
| Now simply select the mktoolbox executable and click open: |
|
| [{Image src='https://cdn.discordapp.com/attachments/910541946014011462/970385596155580456/Screenshot_from_2022-05-01_14-04-48.png' width='..' height='..' align='left|center|right' style='..' class='..' }] |
|
| Now that mktoolbox is selected, simply do the same thing with nitropaint. After that is done, simply click on add selected program: |
|
| [{Image src='https://cdn.discordapp.com/attachments/910541946014011462/970386173107245066/Screenshot_from_2022-05-01_14-07-27.png' width='..' height='..' align='left|center|right' style='..' class='..' }] |
|
| Now that we have the programs added to the steam library, right click on the program and select properties: |
|
| [{Image src='https://cdn.discordapp.com/attachments/910541946014011462/970387469293994044/Screenshot_from_2022-05-01_14-11-14.png' width='..' height='..' align='left|center|right' style='..' class='..' }] |
|
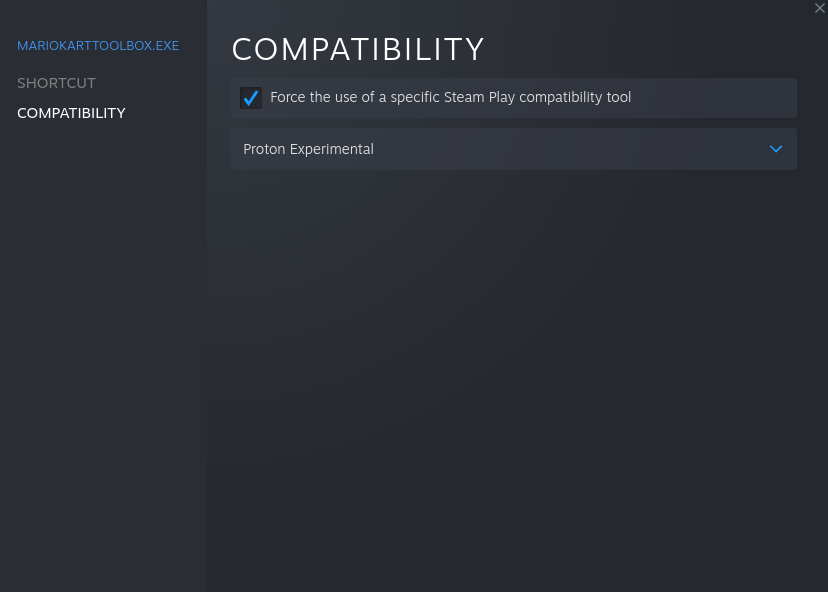
| You will be greeted with a new window, select compatibility and after that click on __Force the use of specific steam play compatibility tool__: |
|
| [{Image src='https://cdn.discordapp.com/attachments/910541946014011462/970387669588779078/Screenshot_from_2022-05-01_14-11-22.png' width='..' height='..' align='left|center|right' style='..' class='..' }] |
|
| __Note: you must do this with both mktoolbox and nitropaint.__ |
|
| After that is done, you are finally done and can launch mktoolbox and nitropaint!!! |
|
| !!!Extracting the MKDS file system: |
|
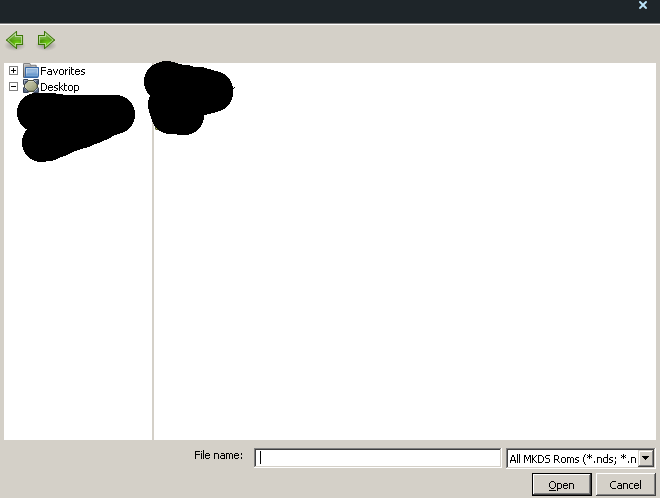
| The goal here now is to extract the entire Mario kart DS file system and have every file accessible to us to mess with. First lets launch Mktoolbox in steam. We should be greeted with something like this: |
|
| [{Image src='https://cdn.discordapp.com/attachments/910541946014011462/970389650738925609/Screenshot_from_2022-05-01_14-20-13.png' width='..' height='..' align='left|center|right' style='..' class='..' }] |
|
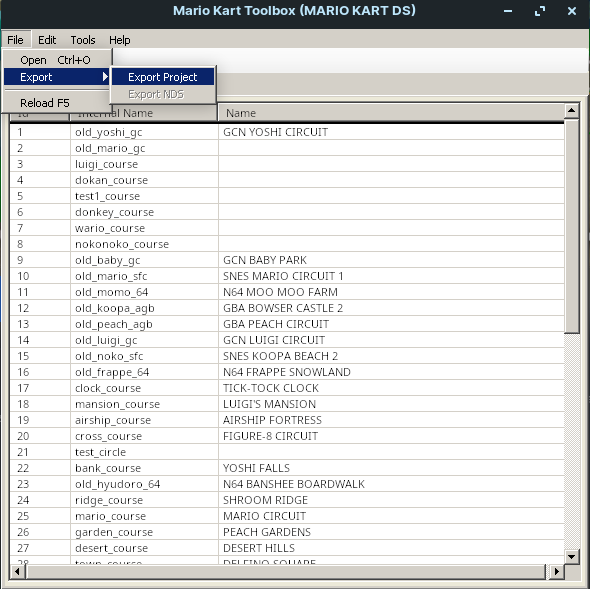
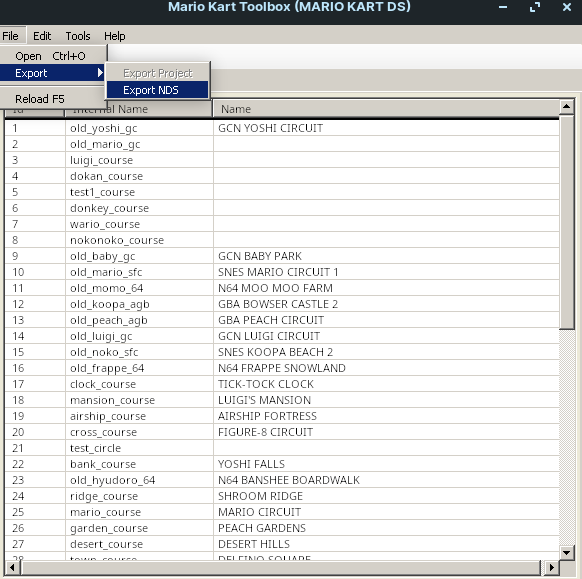
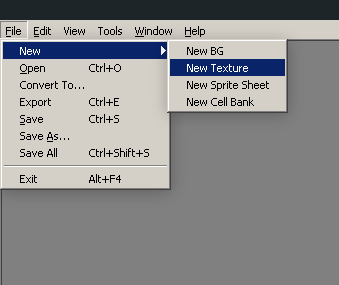
| In this window all you have to do is simply search for your Mario kart ds rom and open it. After you did that you should be greeted with the main program. Now what we will want to do is simply hover to file and select export > export project: |
|
| [{Image src='https://cdn.discordapp.com/attachments/910541946014011462/970392032478629918/Screenshot_from_2022-05-01_14-30-17.png' width='..' height='..' align='left|center|right' style='..' class='..' }] |
|
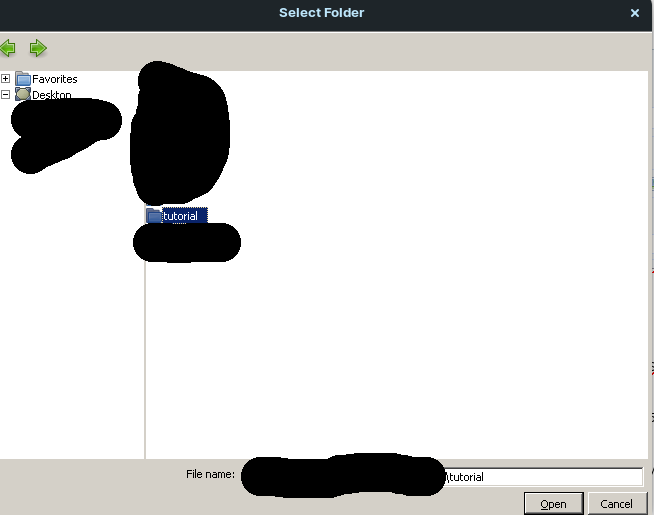
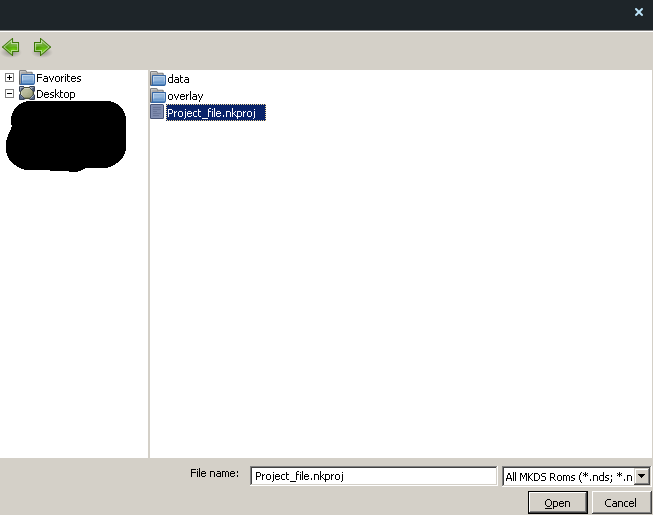
| After that then simply select the folder you wish to save the project file on: |
|
| [{Image src='https://cdn.discordapp.com/attachments/910541946014011462/970393669788127232/Screenshot_from_2022-05-01_14-33-21.png' width='..' height='..' align='left|center|right' style='..' class='..' }] |
|
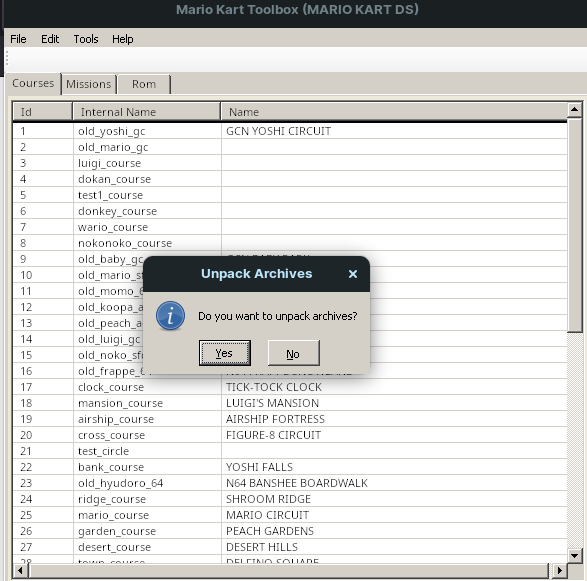
| __You will have a prompt asking you to unpack the files, select yes:__ |
|
| [{Image src='https://cdn.discordapp.com/attachments/910541946014011462/970395806496616488/Screenshot_from_2022-05-01_14-33-29.png' width='..' height='..' align='left|center|right' style='..' class='..' }] |
|
|
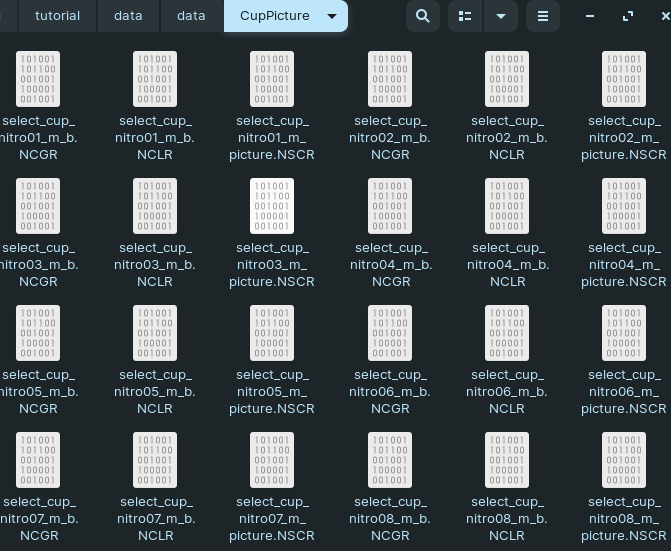
| After you are done with that simply go to the directory you have your files saved: |
|
| [{Image src='https://cdn.discordapp.com/attachments/910541946014011462/970395825333231636/Screenshot_from_2022-05-01_14-34-57.png' width='..' height='..' align='left|center|right' style='..' class='..' }] |
|
| Now that is done you have access to the entire mkds file system!!! |
|
| Now you can open the .nkproj file in mktoolbox and edit the game from the extracted files: |
|
| [{Image src='https://cdn.discordapp.com/attachments/910541946014011462/970404632394334248/Screenshot_from_2022-05-01_15-19-30.png' width='..' height='..' align='left|center|right' style='..' class='..' }] |
|
| When you are ever done editing anything in the game, all you will have to do is simply export as NDS and save it on the directory of your choice: |
|
| [{Image src='https://cdn.discordapp.com/attachments/910541946014011462/970404646038417478/Screenshot_from_2022-05-01_15-19-45.png' width='..' height='..' align='left|center|right' style='..' class='..' }] |
|
| With this we conclude this and now on to the next section... |
|
| !!!Importing your custom track/character/kart: |
|
| __Note: You must have blender and the NNS plugins installed on the program already. You also have to have wine installed, also have g3dcvtr downloaded and extracted before we continue.__ |
|
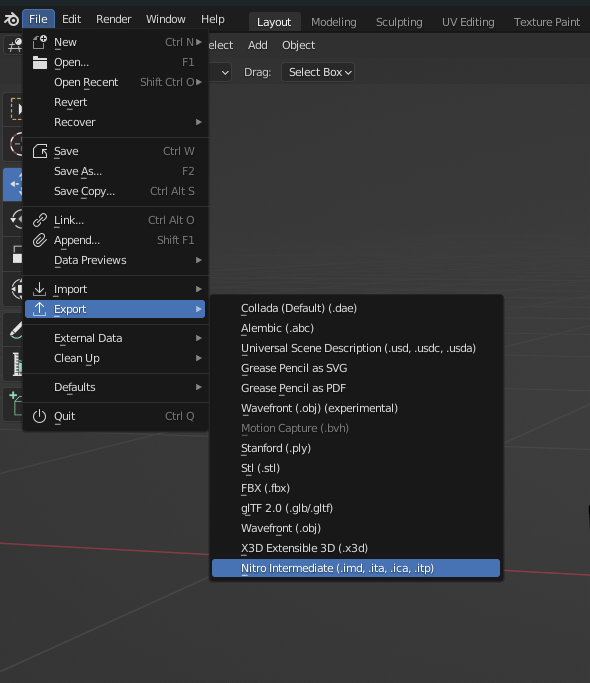
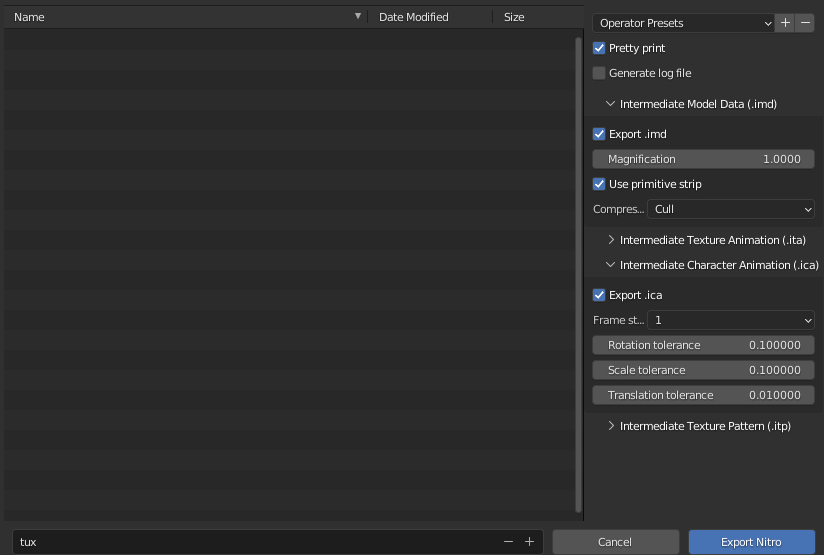
| Let us start in Blender, assuming you already have your custom model made. all you would have to do now is export the custom model as imd and if it uses animations then enable .ica or .ita: |
|
| [{Image src='https://cdn.discordapp.com/attachments/910541946014011462/970410072117235722/Screenshot_from_2022-05-01_15-38-01.png' width='..' height='..' align='left|center|right' style='..' class='..' }] |
|
| __NOTE:This part is crucial, save your imd, ica or ita in g3dcvtr's directory (the location where you have g3dcvtr on your computer.), you will need them there for the next crucial step.__ |
|
| [{Image src='https://cdn.discordapp.com/attachments/910541946014011462/970410094728716358/Screenshot_from_2022-05-01_15-38-52.png' width='..' height='..' align='left|center|right' style='..' class='..' }] |
|
| Now that you have the files saved on g3dcvtrs directory, open the terminal on g3dcvtrs directory and type the following command: |
|
| |__wine cmd__ |
|
| now you should be in the windows command line, now type the following commands following your specific needs: |
|
| -For exporting the nsbmd and nsbtx type: |
|
| |start mdltex.bat (name of your imd file) |
|
| -For exporting only the nsbmd |
|
| |start g3dcvtr.exe (name of your imd file) |
|
| -For exporting only the nsbca |
|
| |start g3dcvtr.exe (name of your ica file) |
|
| -For exporting only the nsbta |
|
| |start g3dcvtr.exe (name of your ita file) |
|
| -For exporting only the nsbtp |
|
| |start g3dcvtr.exe (name of your itp file) |
|
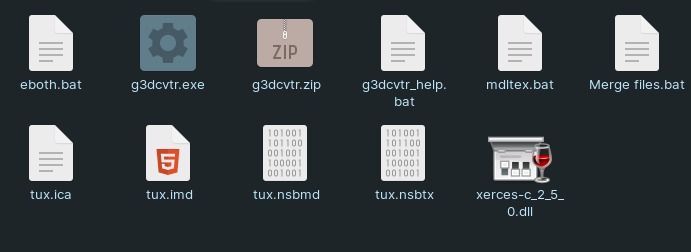
| After they are done executing the exported files should be in your directory like this: |
|
| [{Image src='https://cdn.discordapp.com/attachments/910541946014011462/970415030120099901/Screenshot_from_2022-05-01_16-01-27.png' width='..' height='..' align='left|center|right' style='..' class='..' }] |
|
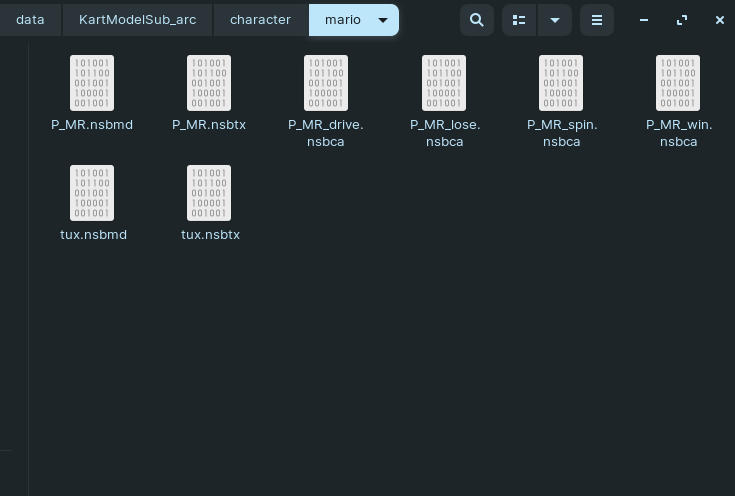
| Now simply replace the files you want to replace in the game, i decided to replace Mario's in game model and animations. Remember to rename the files exactly to how it was named before: |
|
| [{Image src='https://cdn.discordapp.com/attachments/910541946014011462/970416049621172314/Screenshot_from_2022-05-01_16-04-44.png' width='..' height='..' align='left|center|right' style='..' class='..' }] |
|
| After that is done we must launch Mktoolbox and check if our custom model is there and we can begin editing the course or attributes of our character or kart. Once you are done editing, then simply export as NDS our project. |
|
| __Note: If you don't know how to export as NDS go back to "Extracting file system" part of the tutorial.__ |
|
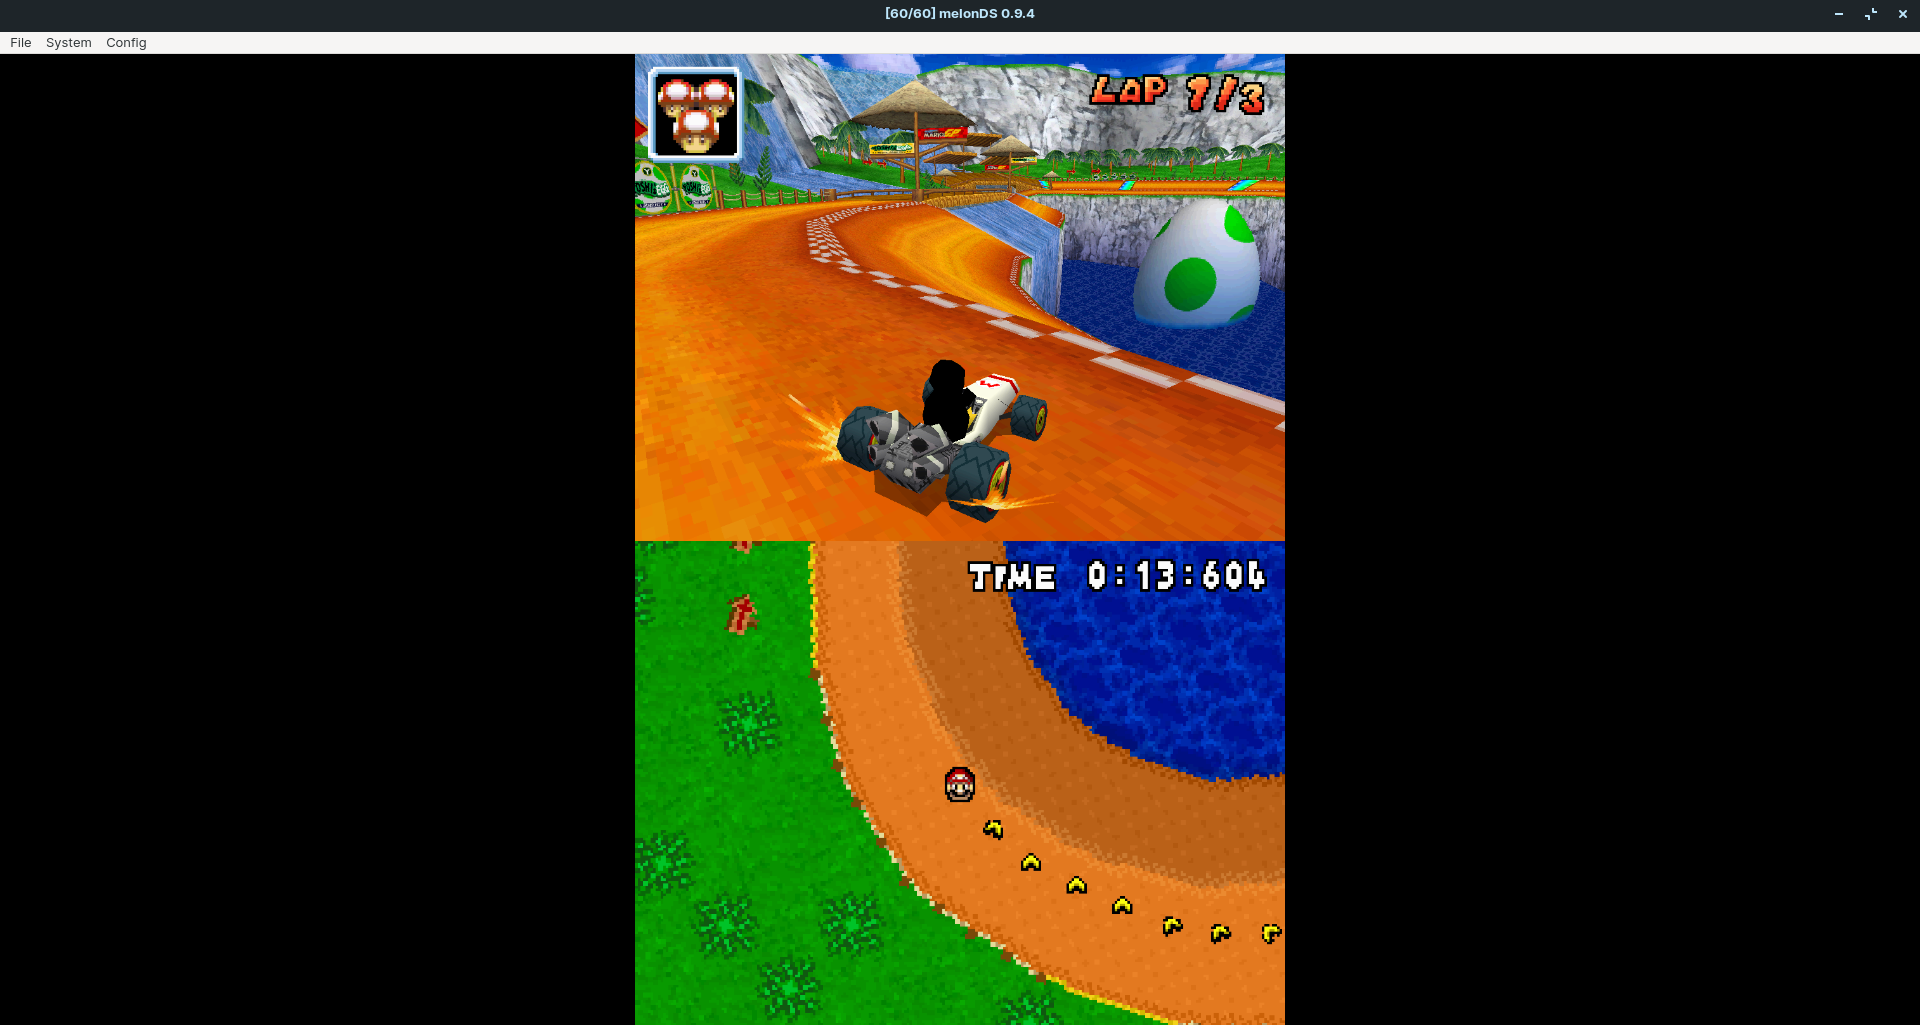
| Finally, all that is left to do is simply launch the custom rom, in this case i will be using melonds: |
|
| [{Image src='https://cdn.discordapp.com/attachments/910541946014011462/970418043668815952/Screenshot_from_2022-05-01_16-14-10.png' width='..' height='..' align='left|center|right' style='..' class='..' }] |
|
| Bingo it imported successfully! |
|
| __If you run into any issue with g3dcvtr as in it spits out an error regarding any of your files you wish to convert, you can come to the mkds modding server on Discord for further assistance. Also be sure you are using the latest version of wine or at the very least wine 5.0.__ |
|
| !!!How to convert textures with Nitropaint: |
|
| __Note: This is assuming if you already have a texture made and simply all you need to do is convert it to the nitro tga format.__ |
|
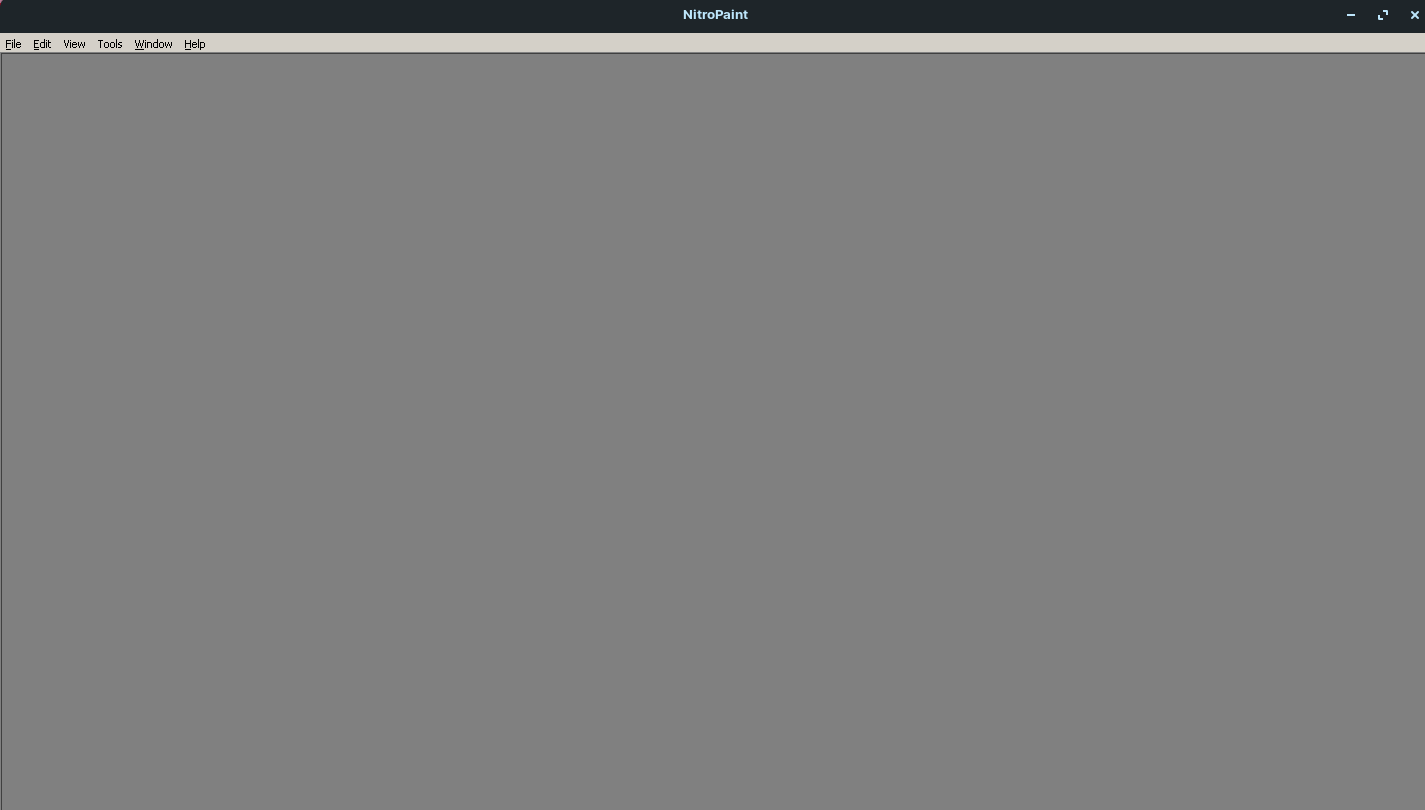
| First lets launch Nitropaint (__Note: you must have already prepared Nitropaint to launch with proton or you can also launch Nitropaint with wine as its fully compatible, be sure that wine is on its latest version if you desire to launch it with wine.__): |
|
| [{Image src='https://cdn.discordapp.com/attachments/910541946014011462/970421210649341993/Screenshot_from_2022-05-01_16-26-44.png' width='..' height='..' align='left|center|right' style='..' class='..' }] |
|
| now that you are in the main program, you can simply drag and drop the texture into the program and select create texture. You can also manually open the texture and look for it in your directory: |
|
| -Drag and drop |
|
| [{Image src='https://cdn.discordapp.com/attachments/910541946014011462/970422872474550333/Screenshot_from_2022-05-01_16-31-56.png' width='..' height='..' align='left|center|right' style='..' class='..' }] |
|
| -Opening the image manually |
|
| [{Image src='https://cdn.discordapp.com/attachments/910541946014011462/970422886428975125/Screenshot_from_2022-05-01_16-32-27.png' width='..' height='..' align='left|center|right' style='..' class='..' }] |
|
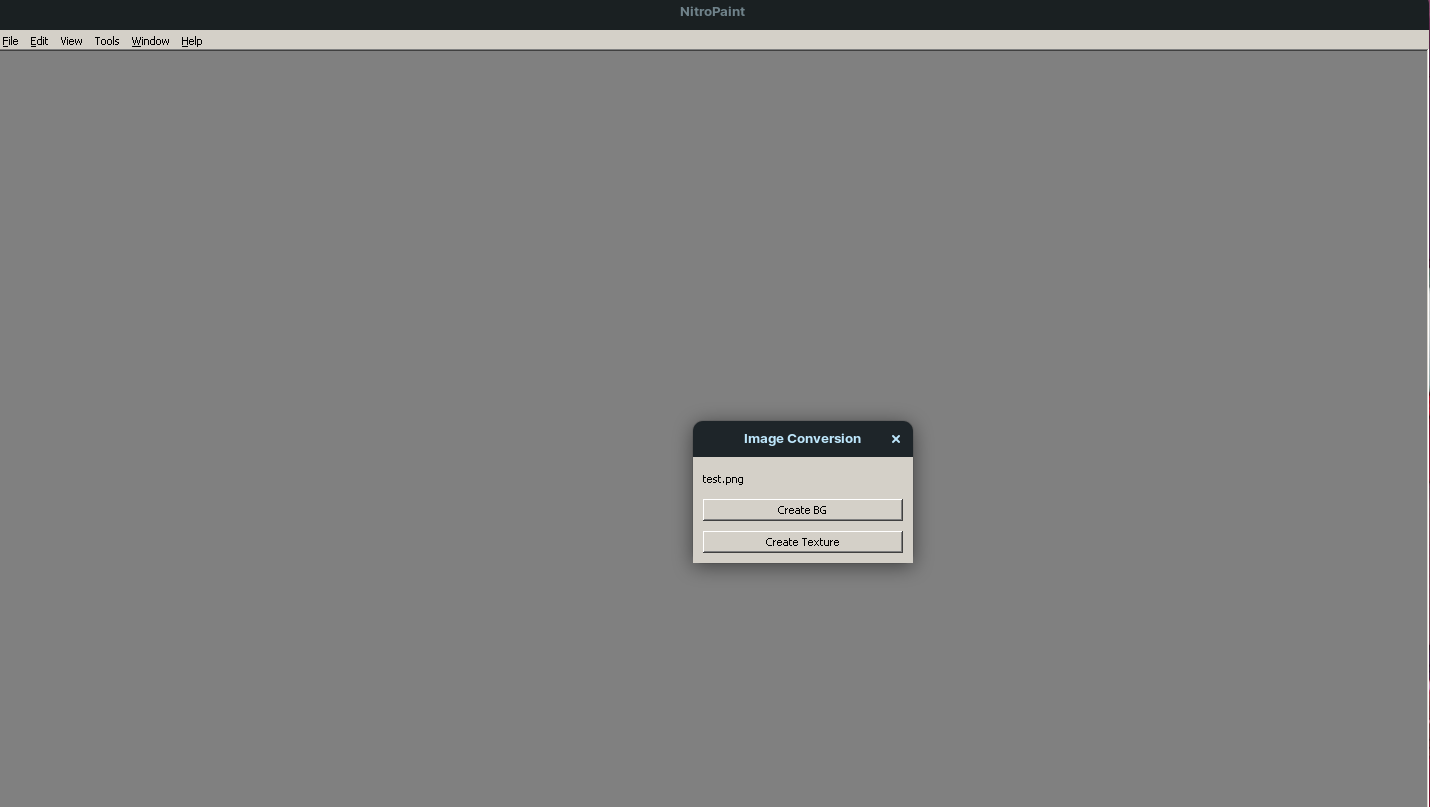
| After you have that you should be met with something like this: |
|
| [{Image src='https://cdn.discordapp.com/attachments/910541946014011462/970423648051662868/Screenshot_from_2022-05-01_16-36-35.png' width='..' height='..' align='left|center|right' style='..' class='..' }] |
|
| click on __convert to..__ and you should have this window pop up: |
|
| [{Image src='https://cdn.discordapp.com/attachments/910541946014011462/970424517300191262/Screenshot_from_2022-05-01_16-40-04.png' width='..' height='..' align='left|center|right' style='..' class='..' }] |
|
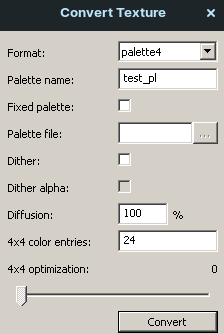
| select the format you want to convert your texture with: |
|
| -Plt4 |
| -tex 4x4 |
| -plt16 |
| -plt256 |
| -a3i5 |
| -a5i3 |
| -direct |
|
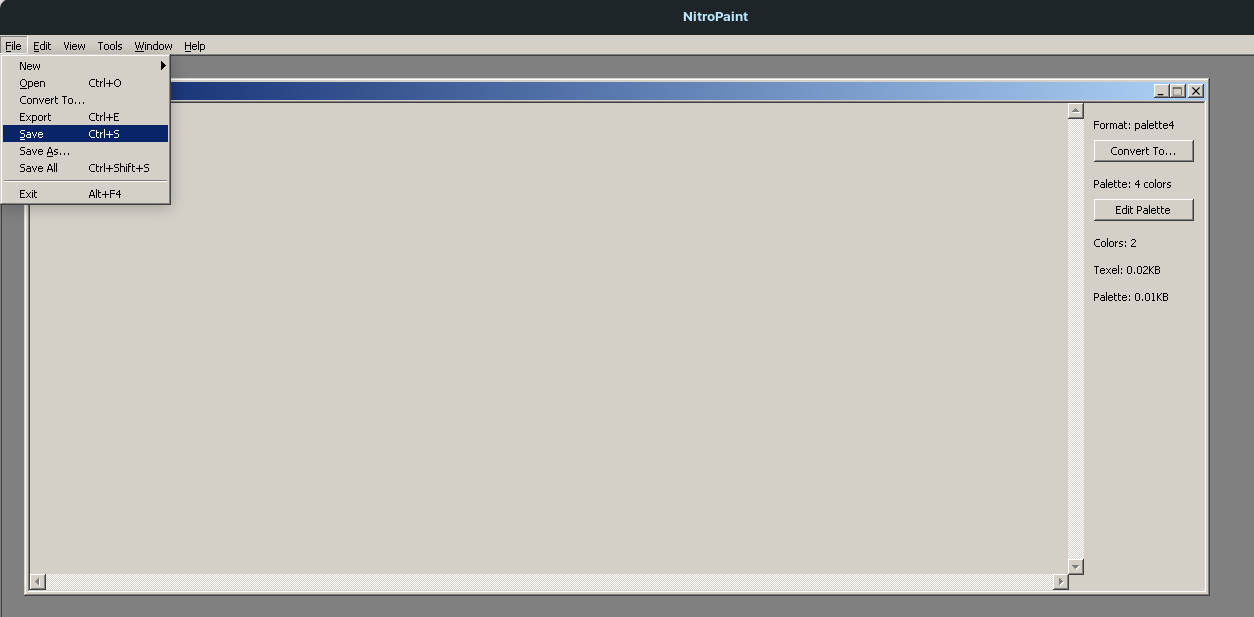
| after you have selected the format and messed with its quality settings if you so desire to. Now click on convert and your texture should be successfully converted. Now all that is left is to save the image. click on __file__ then click on __save__, then simply choose where you want to save your image: |
|
| [{Image src='https://cdn.discordapp.com/attachments/910541946014011462/970426165288390666/Screenshot_from_2022-05-01_16-46-16.png' width='..' height='..' align='left|center|right' style='..' class='..' }] |
|
| After you saved your image you should have a fully converted Nitro tga texture, to confirm it is, simply drag and drop the image in nitropaint and it should identify the image with the format you converted it with. |
|
|
| !!!Conclusion: |
|
| You have reached the end of this tutorial on how to use mkds modding tools on your linux distribution. If you ever run into any issues along the way, please contact us in the Mario kart ds modding server for further assistance. I hope this tutorial has served you very well and happy modding. |
|
| -Xgone |
